Google Maps utility library란?

https://developers.google.com/maps/documentation/android-api/utility/?hl=ko


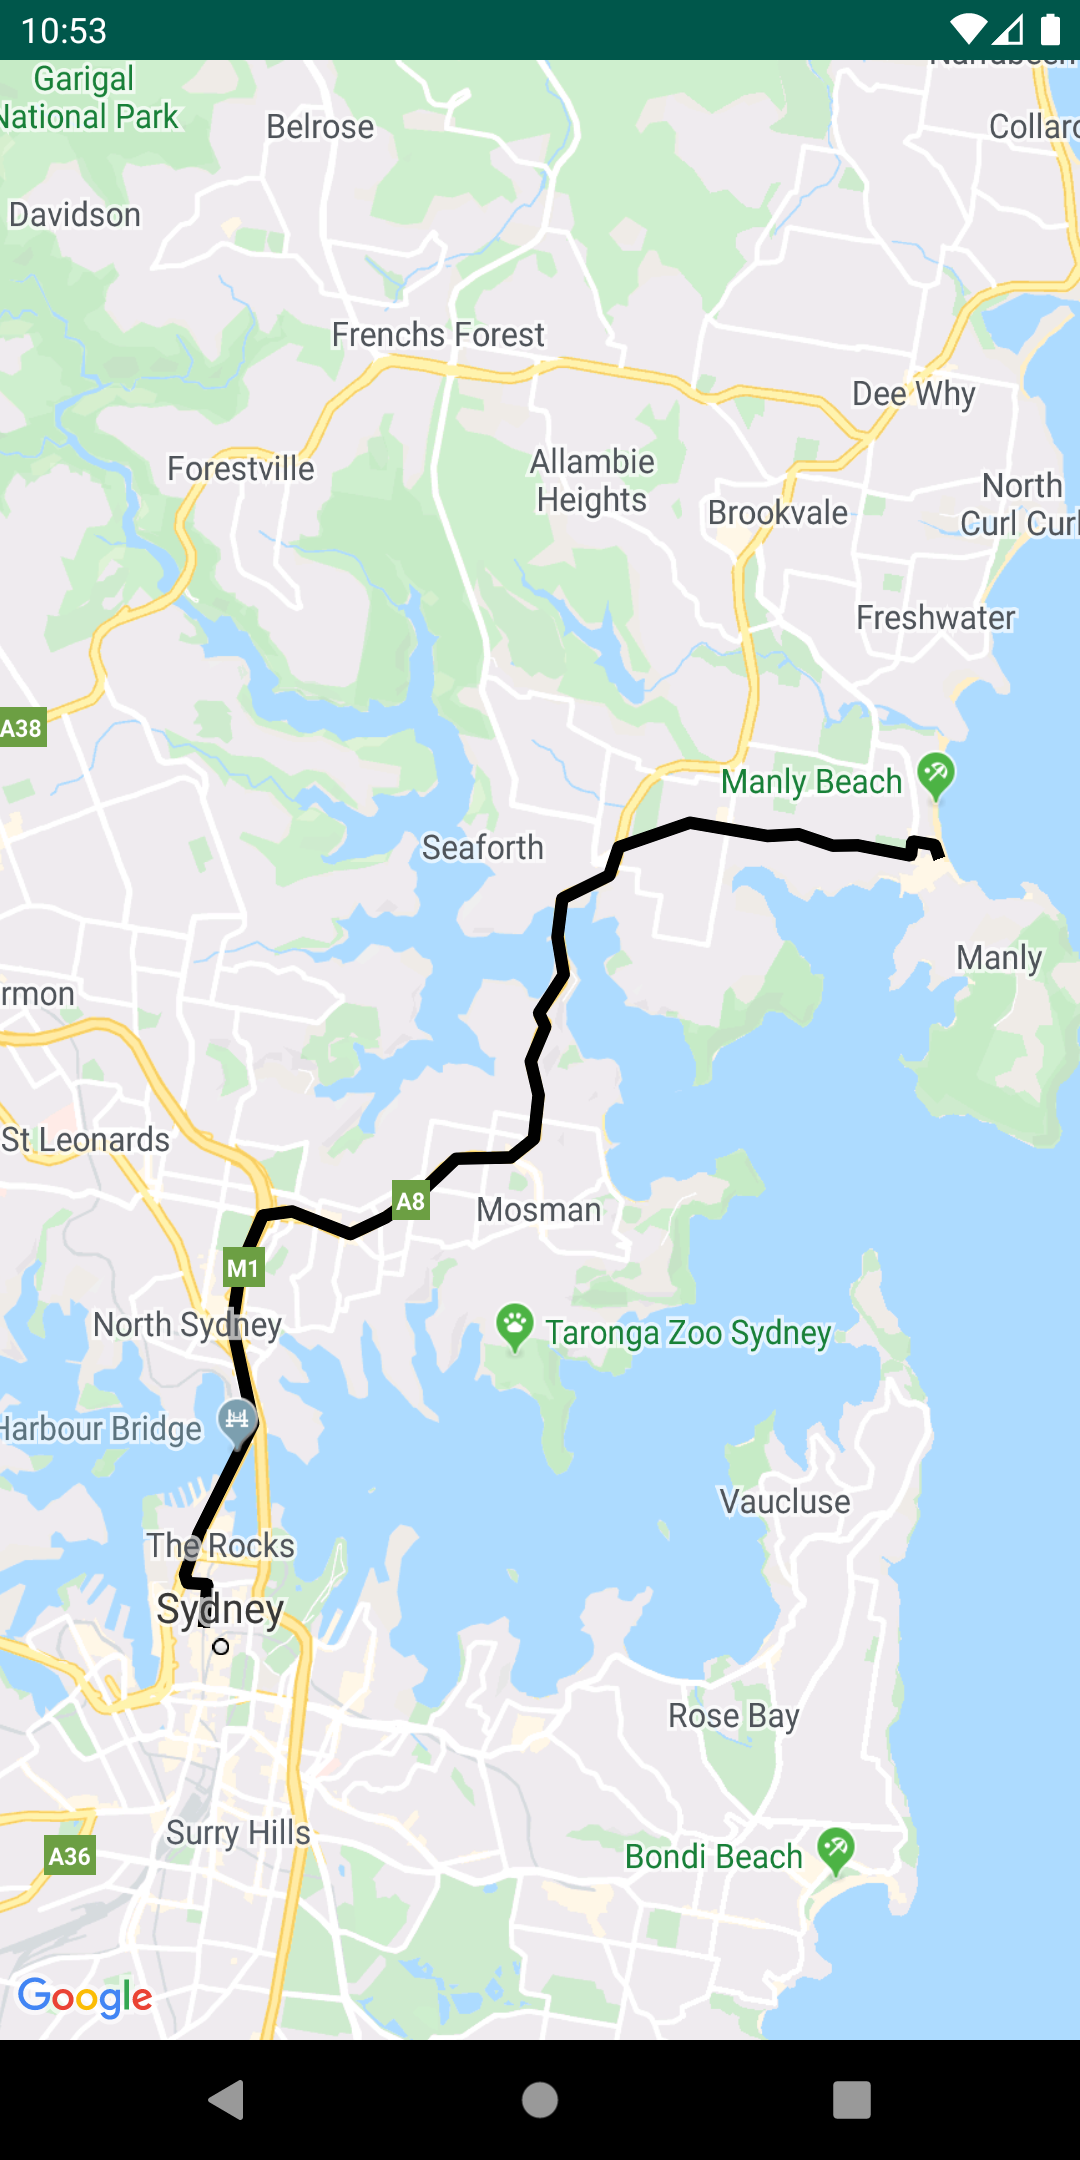
안드로이드에서 Google Maps을 사용하여 개발하다 보면 두 좌표 간 거리,  GeoJSON, KML 등 부족한 부분이 존재한다.


구글에서 이 부분을 메워줄 수 있는 공식 유틸리티 라이브러리를 제공한다.

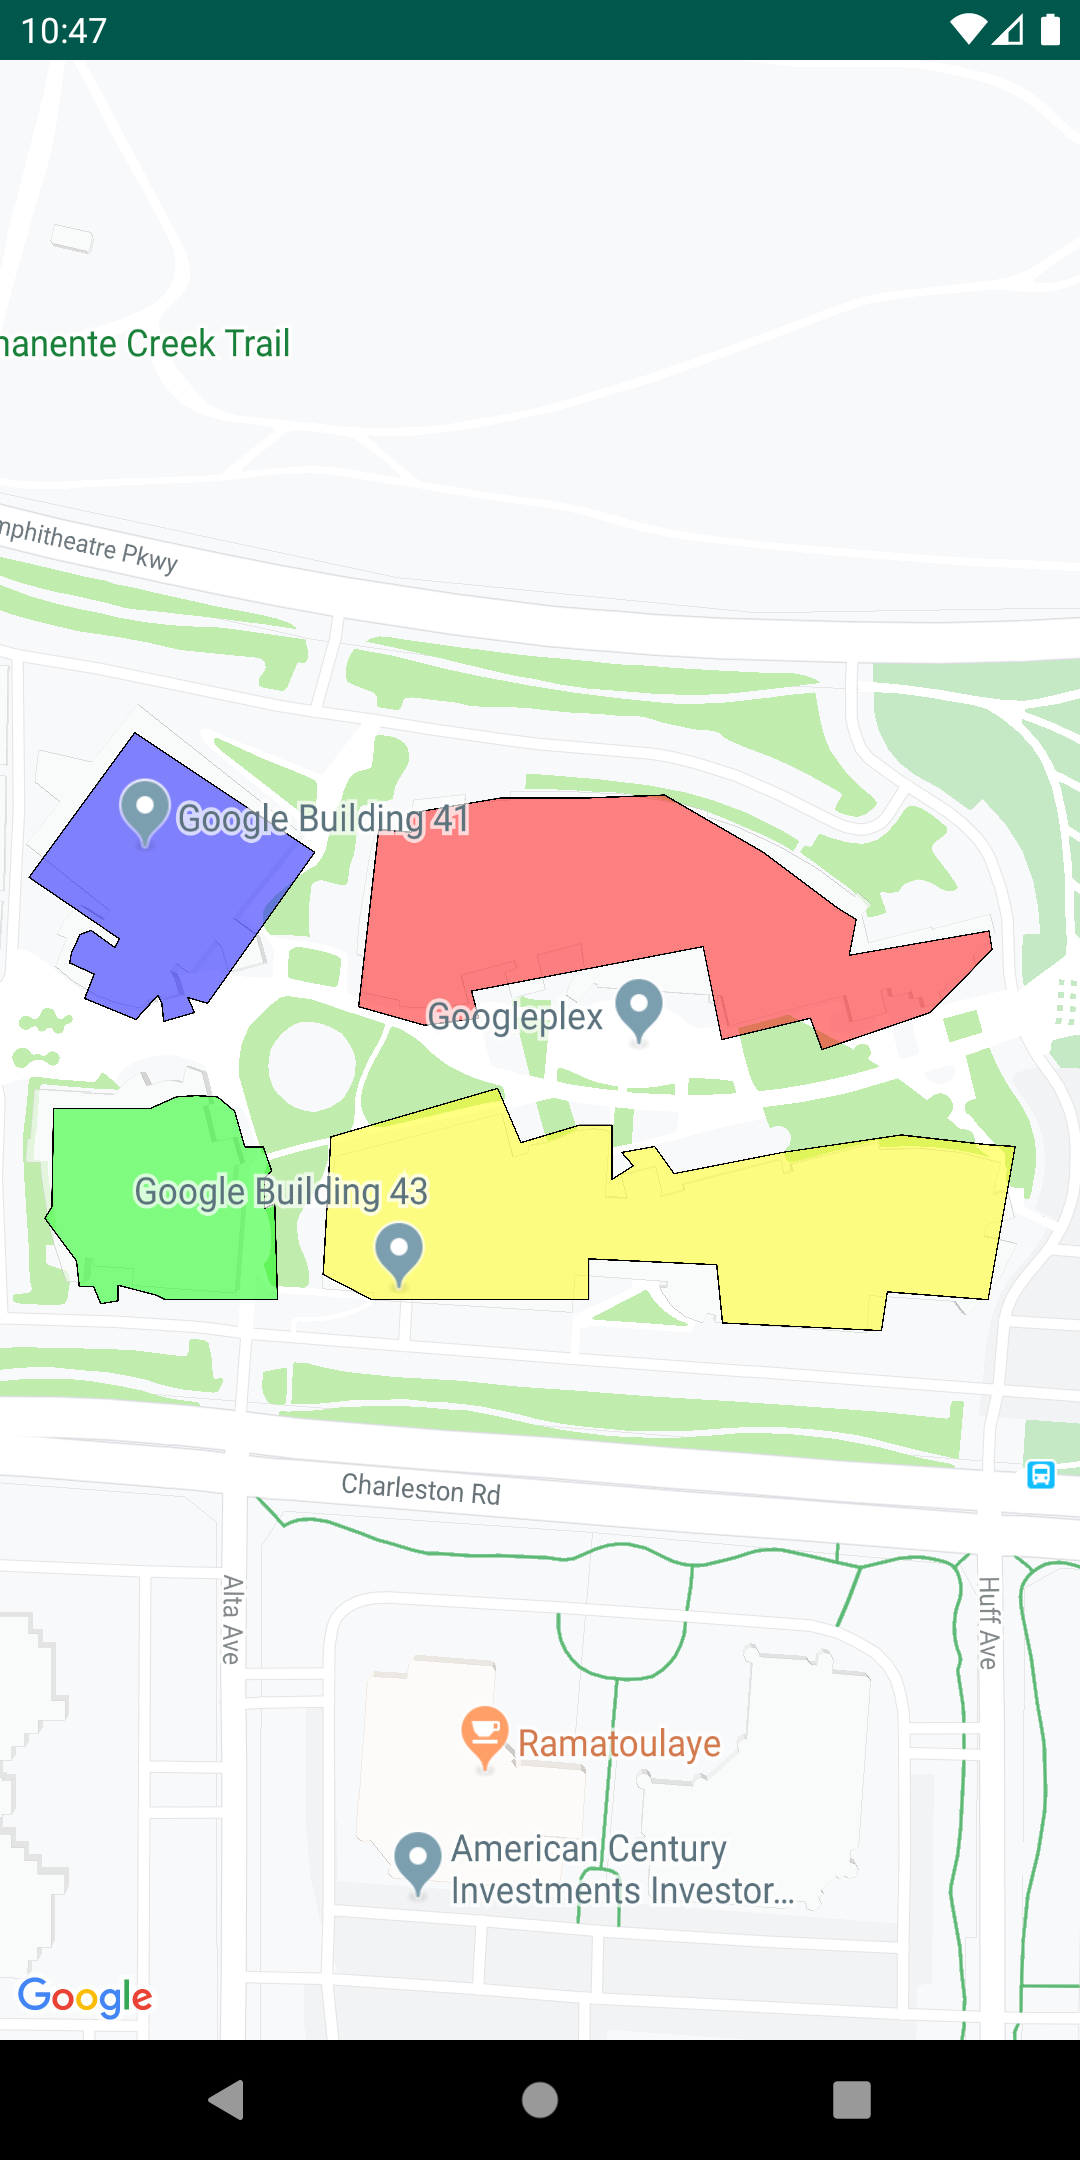
GeoJSON 계층이 있는 지도

지도에 GeoJSON 가져오기

지형지물을 GeoJSON 형식으로 저장하고 이 유틸리티를 사용하여 지도 위의 계층으로 렌더링할 수 있습니다. addLayer()를 호출하여 지도에 GeoJSON 데이터를 추가합니다. addFeature()를 호출하고 GeoJsonFeature 객체에 전달하여 개별 지형지물을 추가할 수도 있습니다.

자세한 내용은 Google Maps Android GeoJSON 유틸리티에 관한 문서를 참조하세요.

KML 계층이 있는 지도

지도에 KML 가져오기

이 유틸리티를 사용하면 KML 객체를 지리적 셰이프로 변환하고 지도 위의 계층으로 렌더링할 수 있습니다. addLayerToMap()을 호출하여 지도에 계층을 추가합니다. Placemark, GroundOverlay, Document 또는 Folder에서 getProperties()를 호출하여 KML 객체의 속성에 액세스할 수 있습니다.

자세한 내용은 Google Maps Android KML 유틸리티에 관한 문서를 참조하세요.

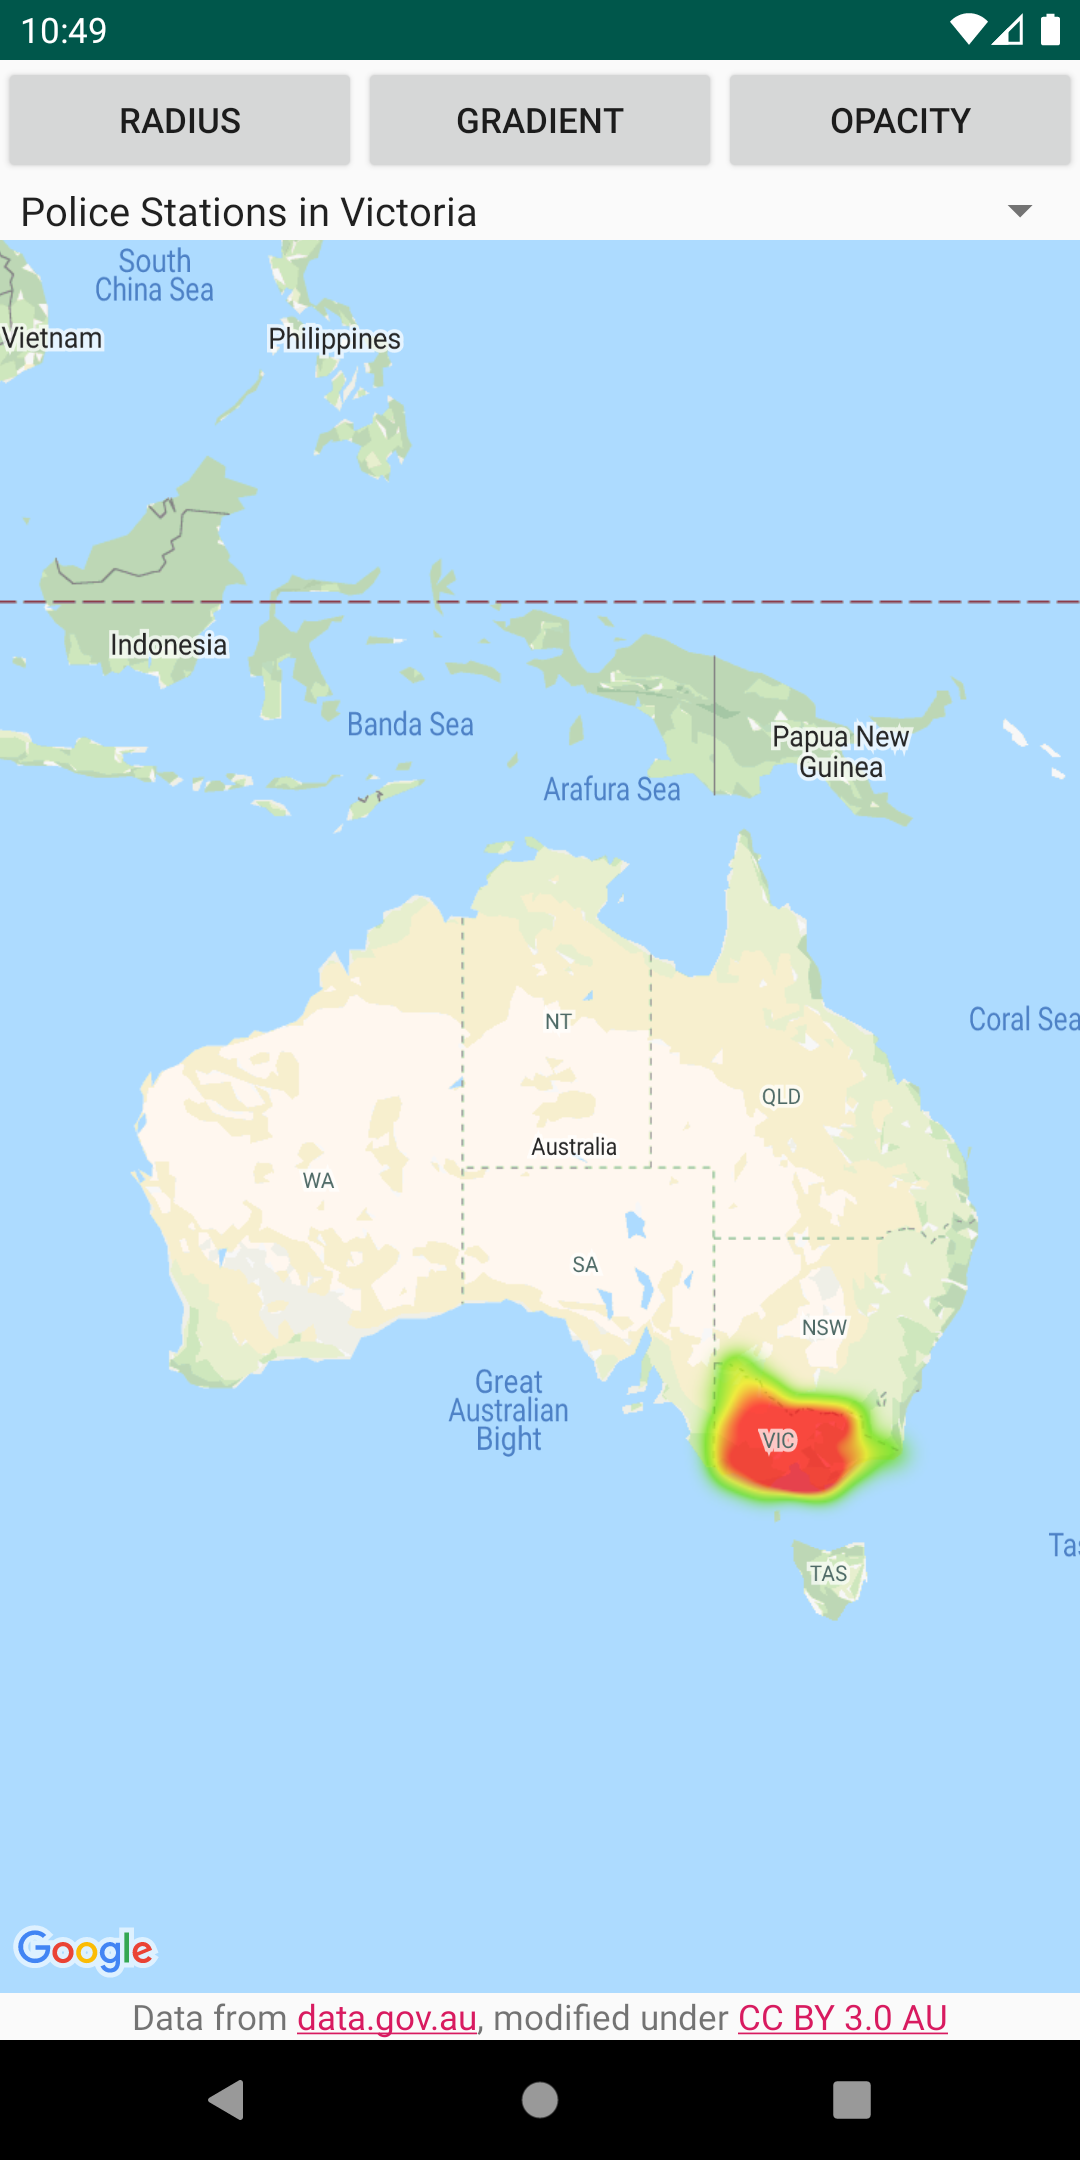
열지도가 있는 지도

지도에 열지도 추가

열지도를 사용하면 뷰어가 지도에서 데이터 지점의 분포와 상대적 강도를 쉽게 이해할 수 있습니다. 열지도는 각 위치에 마커를 배치하는 대신 색상과 셰이프를 사용하여 데이터의 분포를 나타냅니다. HeatmapTileProvider를 생성하고 지도의 관심 지점을 나타내는 LatLng 객체 컬렉션에 전달합니다. 그런 다음 새 TileOverlay를 생성하여 열지도 타일 제공자에 전달하고, 지도에 타일 오버레이를 추가합니다.

자세한 내용은 Google Maps Android 열지도 유틸리티에 관한 문서를 참조하세요.

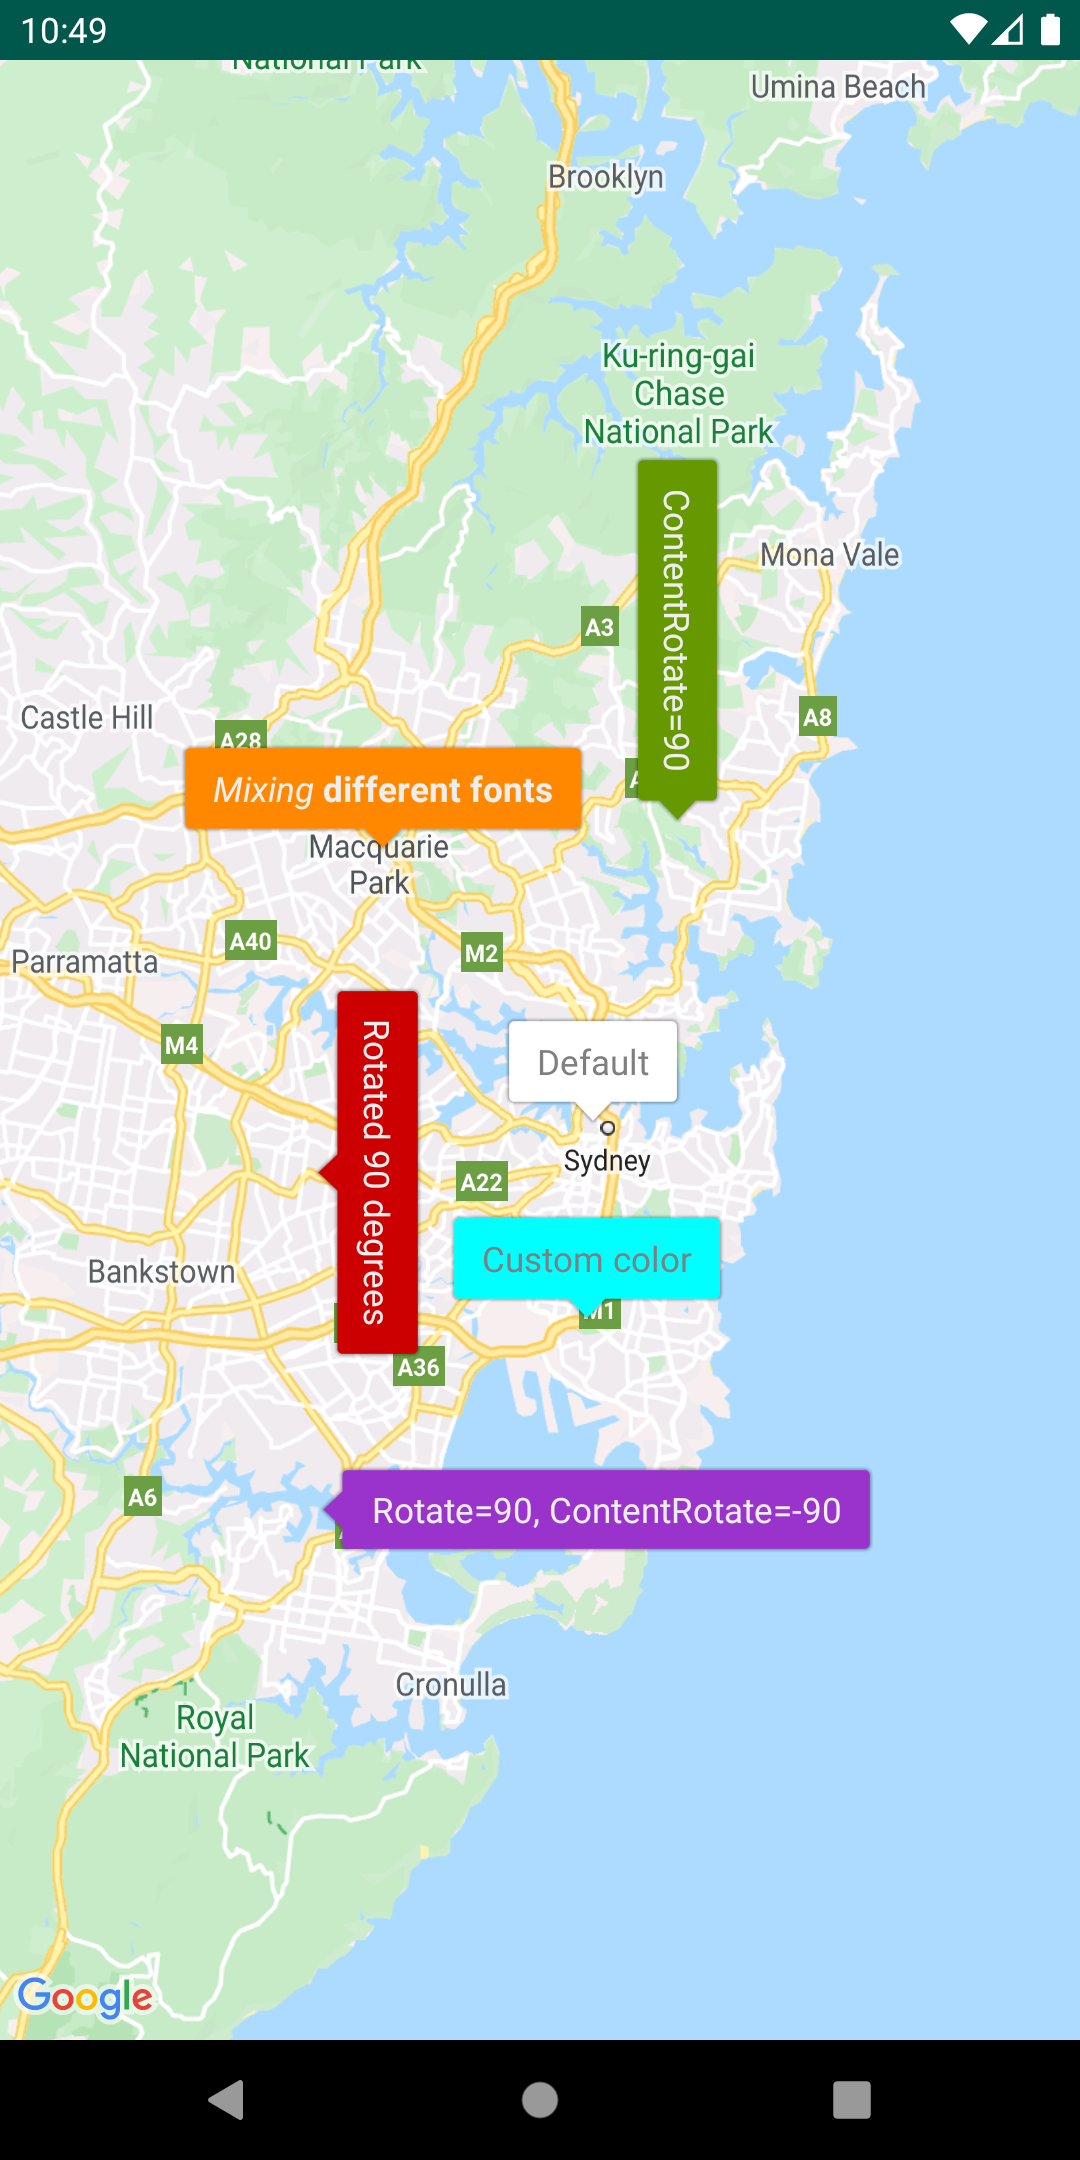
버블 아이콘이 있는 지도

버블 아이콘을 통해 마커 사용자 지정

IconGenerator를 추가하여 마커에 정보 조각을 표시합니다. 이 유틸리티는 마커 아이콘을 정보 창처럼 보이게 해서, 여기에 텍스트와 다른 콘텐츠를 담는 방법을 제공합니다. 정보 창은 한 번에 하나만 열 수 있지만 이 유틸리티는 하나 이상의 마커를 동시에 열 수 있다는 장점이 있습니다. 또한, 마커의 스타일을 지정하고, 마커 및/또는 콘텐츠의 방향을 변경하고, 마커의 배경 이미지/나인 패치를 변경할 수 있습니다.

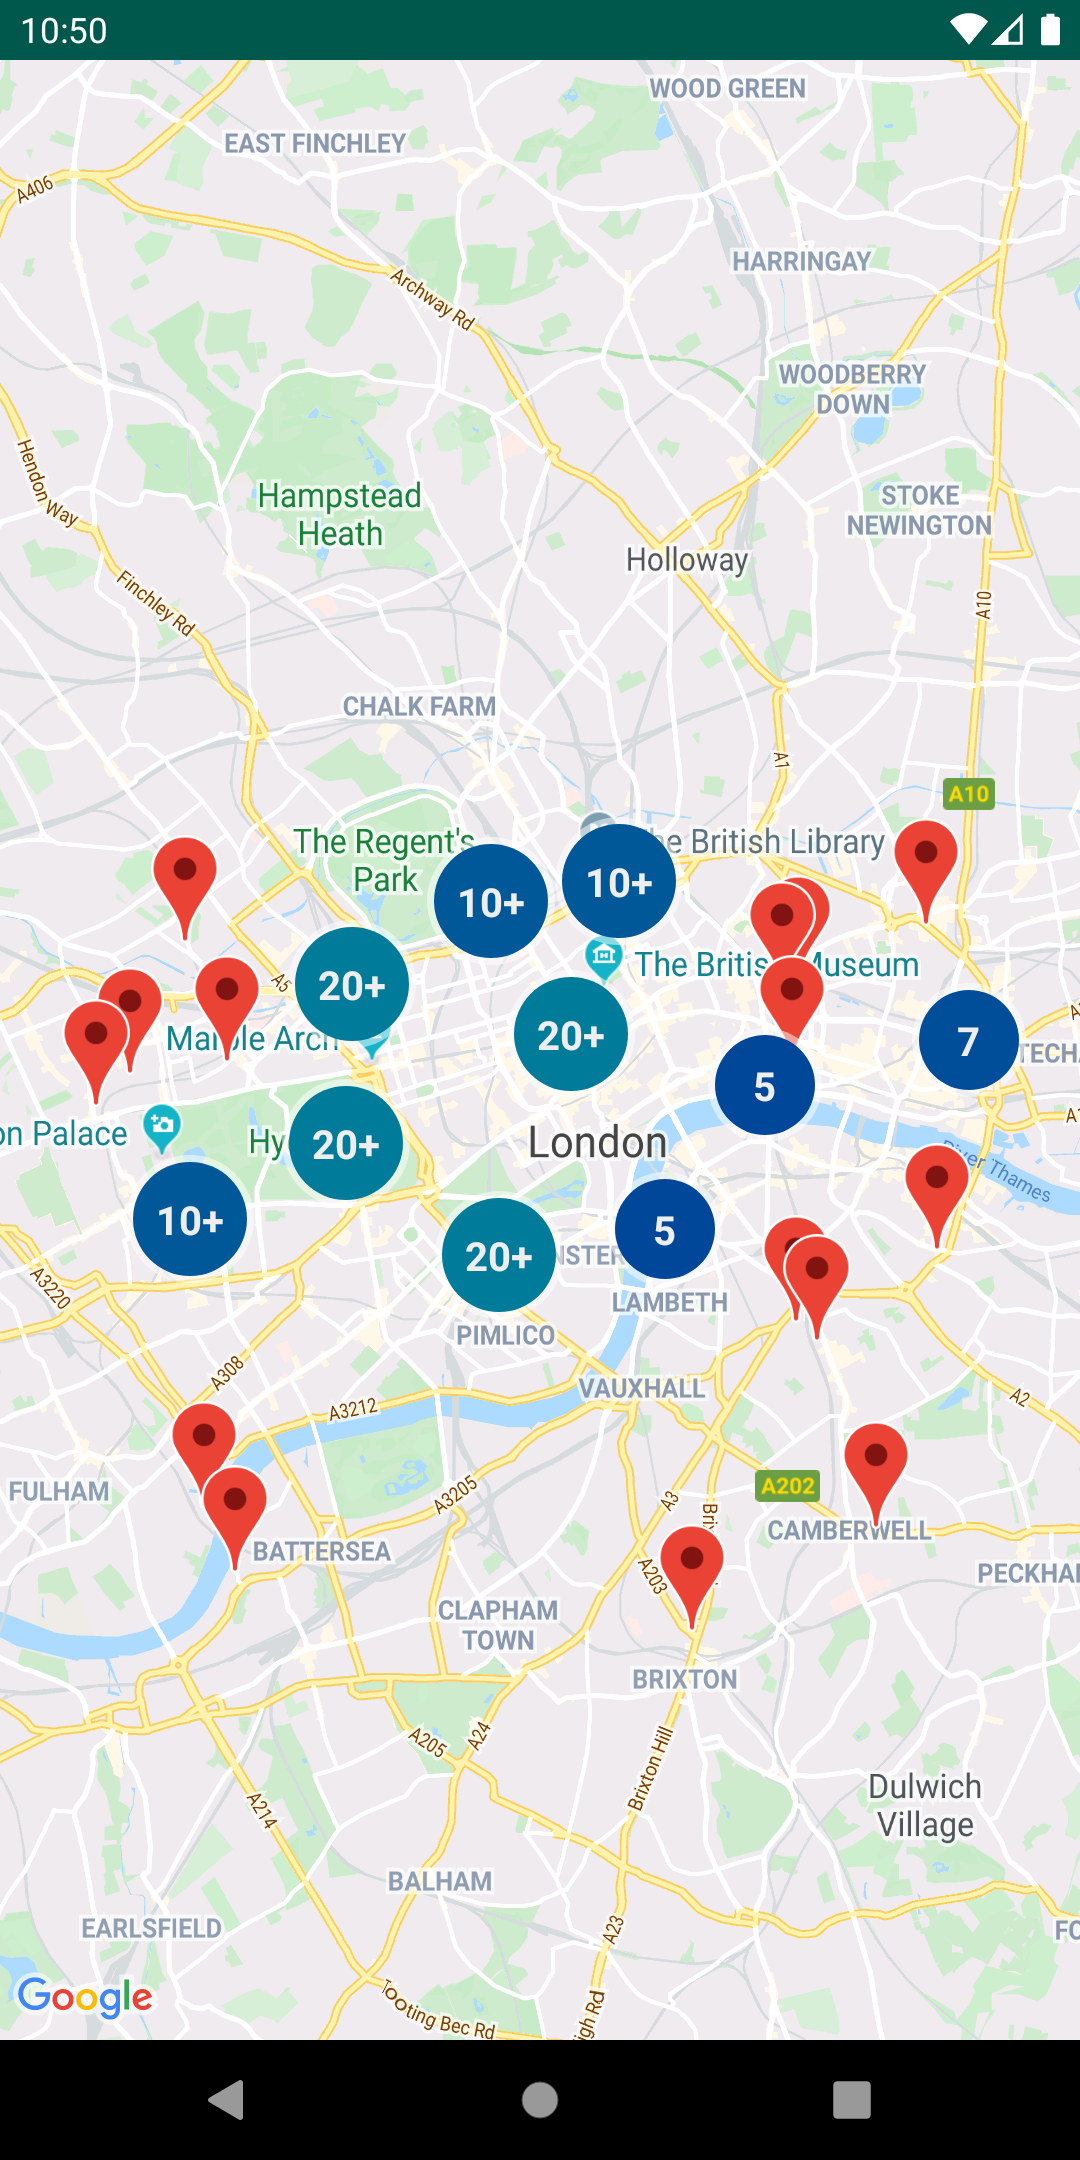
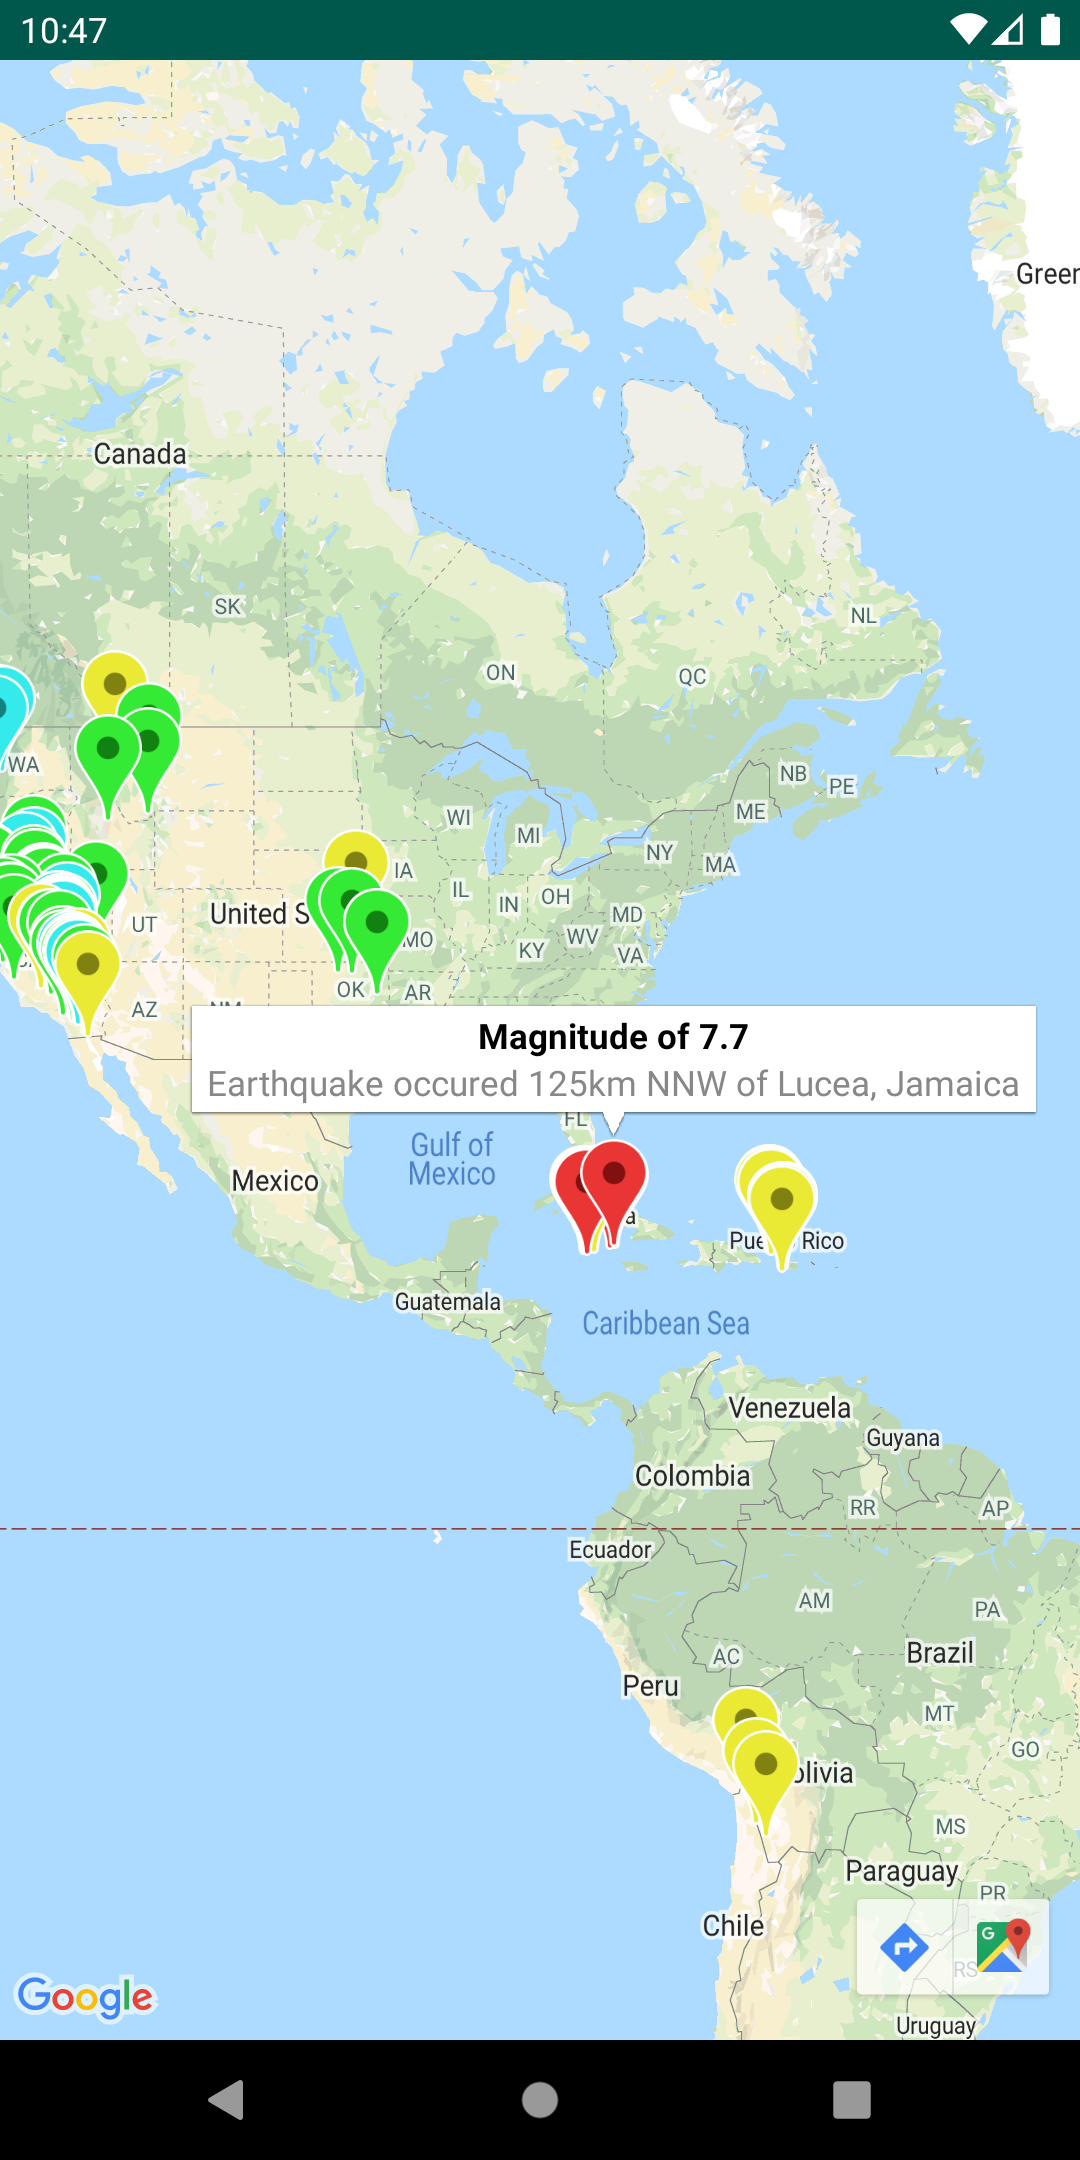
클러스터형 마커가 있는 지도

마커 클러스터 관리

ClusterManager를 사용하면 다양한 확대/축소 수준에서 여러 개의 마커를 관리할 수 있습니다. 즉, 지도의 가독성을 해치지 않으면서도 지도에 많은 마커를 넣을 수 있습니다. 사용자가 높은 확대/축소 수준에서 지도를 보면, 개별 마커가 지도에 나타납니다. 사용자가 낮은 확대/축소 수준으로 축소하면, 마커가 클러스터로 모여서 지도를 보기 쉽게 해줍니다.

자세한 내용은 Google Maps Android 마커 클러스터링 유틸리티를 참조하세요.

인코딩된 폴리라인이 있는 지도

폴리라인 인코딩 및 디코딩

PolyUtil은 인코딩된 폴리라인과 폴리곤을 경도/위도 좌표로 변환하거나 그 반대로 변환할 때 유용합니다.

Google 지도에서 폴리라인이나 폴리곤을 정의하는 경도와 위도 좌표는 인코딩된 문자열로 저장됩니다. 폴리라인 인코딩에 대한 자세한 설명을 참조하세요. Google Maps Directions API와 같은 Google API의 응답에서 이 인코딩된 문자열을 수신할 수 있습니다.

Google Maps Android API 유틸리티 라이브러리에서 PolyUtil을 사용하여 일련의 경도/위도 좌표('LatLngs')를 인코딩된 경로 문자열로 인코딩하고, 인코딩된 경로 문자열을 일련의 LatLngs로 디코딩/인코딩할 수 있습니다. 이는 Google Maps API 웹 서비스와의 상호운용성을 보장합니다.

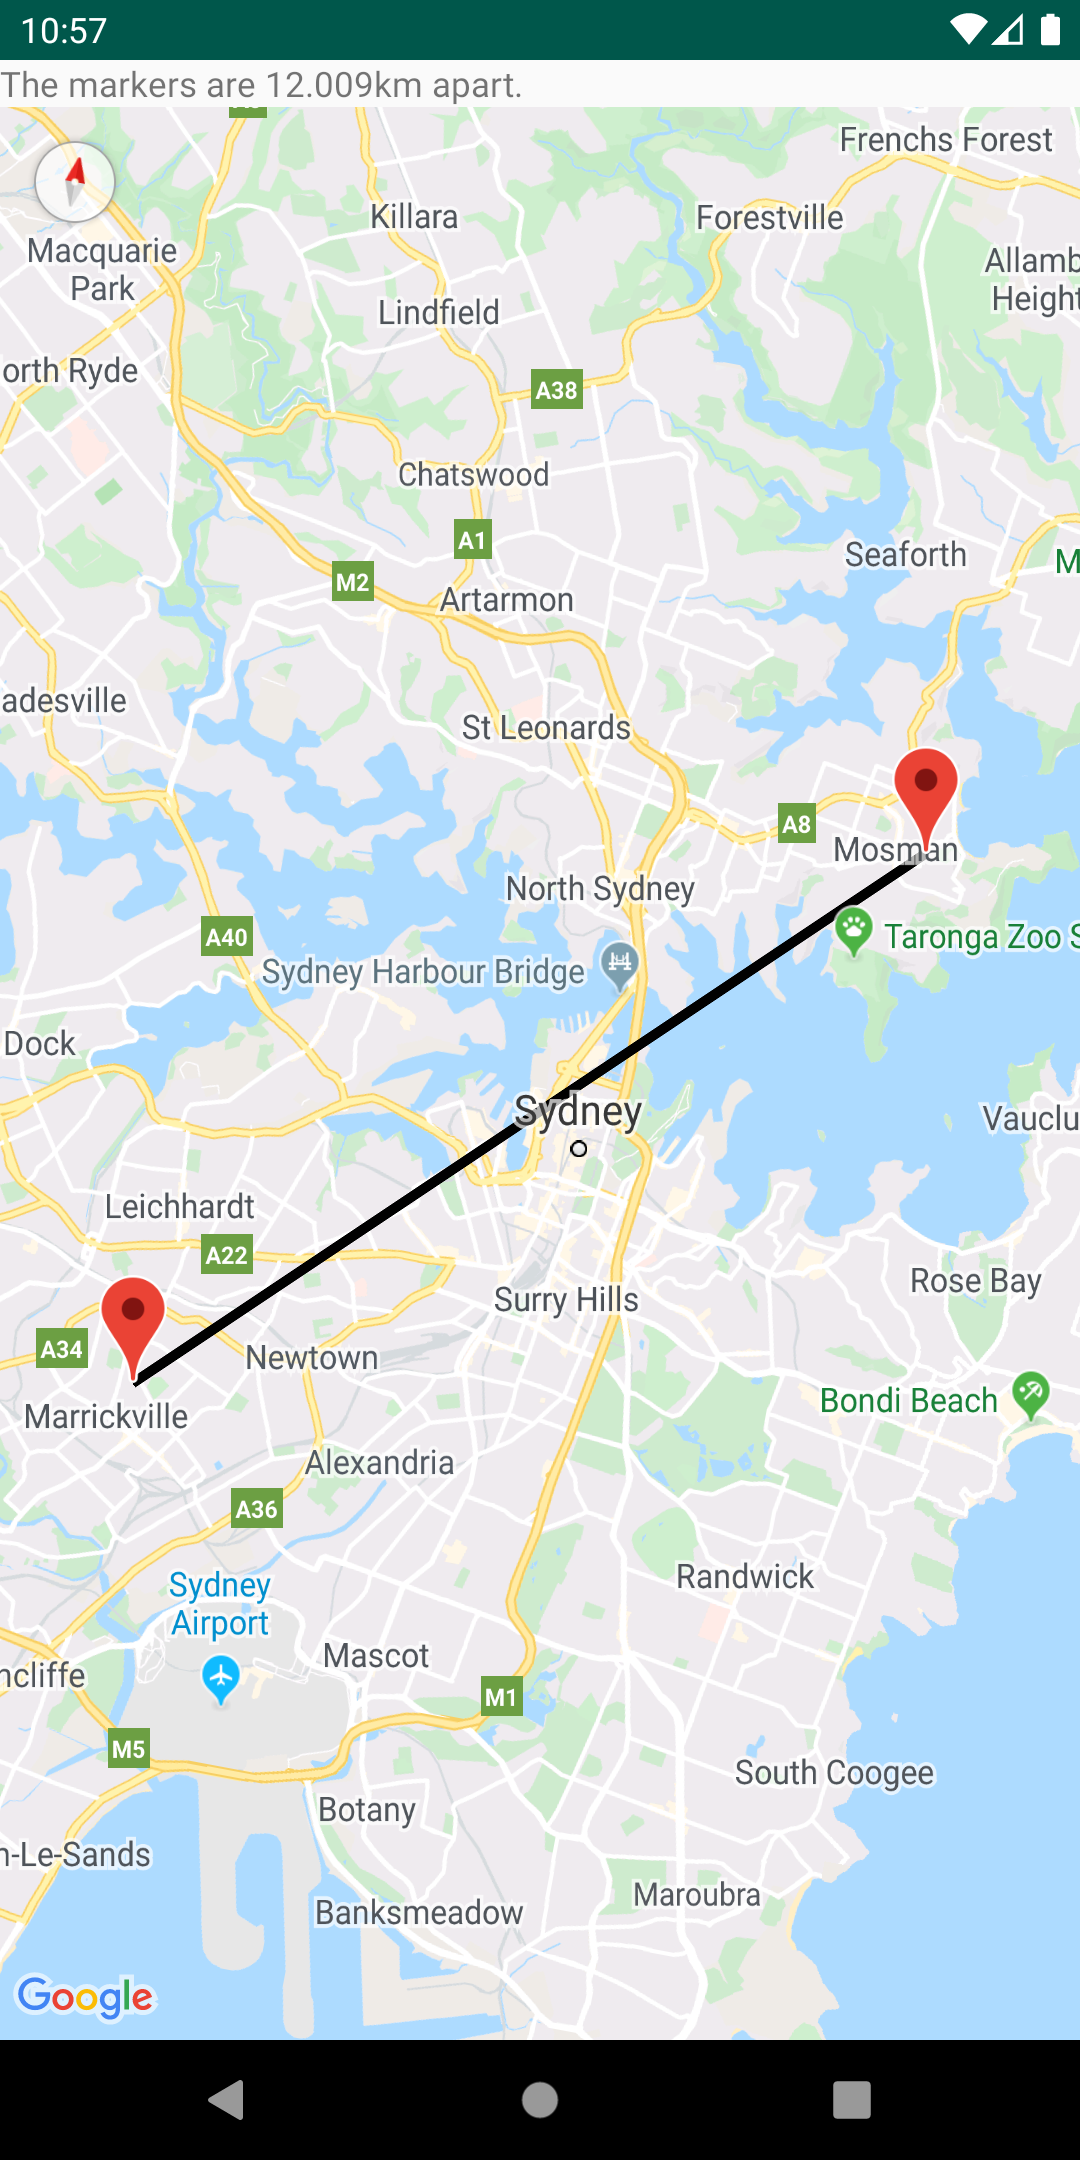
지도 상에서 두 지점 간의 거리 계산

구면 기하학을 통해 거리, 영역 및 방향 계산

SphericalUtil의 구면 기하학 유틸리티를 사용하여 경도와 위도를 기반으로 거리, 영역, 방향을 계산할 수 있습니다. 다음은 유틸리티에서 사용할 수 있는 몇 가지 메서드입니다.

  • computeDistanceBetween() – 두 개의 위도/경도 좌표 사이의 거리를 미터 단위로 반환합니다.
  • computeHeading() – 두 개의 위도/경도 좌표 사이의 베어링을 도 단위로 반환합니다.
  • computeArea() – 지구 위의 닫힌 경로의 영역을 제곱미터 단위로 반환합니다.
  • interpolate() – 주어진 두 지점 사이의 거리에서 지정된 부분에 있는 지점의 경도/위도 좌표를 반환합니다. 예를 들어, 이 메서드를 사용하여 두 지점 사이의 마커를 애니메이트할 수 있습니다.

유틸리티에 포함된 메서드의 전체 목록은 참조 문서를 참조하세요.


GitHub : https://github.com/googlemaps/android-maps-utils

by JamesY 2018. 1. 15. 19:19

Constraint Layout을 이용하여 간단한 이동 애니메이션을 구현할 수 있다.


먼저 Constraint Layout을 어떤식으로 사용하는지 알아야 하기 때문에 모를 경우 배우고 난 뒤 읽는 것을 추천


결과물


1. Floating action button을 Constraint Layout에 넣기

<android.support.constraint.ConstraintLayout
android:id="@+id/menu_layout"
android:layout_width="wrap_content"
android:layout_height="match_parent"
android:layout_gravity="bottom|end" >

<android.support.design.widget.FloatingActionButton
android:id="@+id/fab1"
android:layout_width="wrap_content"
android:layout_height="wrap_content"
android:layout_margin="@dimen/fab_margin"
android:layout_marginBottom="8dp"
android:layout_marginEnd="8dp"
app:layout_constraintBottom_toBottomOf="parent"
app:layout_constraintEnd_toEndOf="parent"
app:layout_constraintStart_toStartOf="parent"
app:srcCompat="@android:drawable/ic_dialog_alert"
app:fabSize="mini" />

<android.support.design.widget.FloatingActionButton
android:id="@+id/fab2"
android:layout_width="wrap_content"
android:layout_height="wrap_content"
android:layout_margin="@dimen/fab_margin"
android:layout_marginBottom="8dp"
android:layout_marginEnd="8dp"
app:layout_constraintBottom_toBottomOf="parent"
app:layout_constraintEnd_toEndOf="parent"
app:layout_constraintStart_toStartOf="parent"
app:srcCompat="@android:drawable/ic_dialog_info"
app:fabSize="mini" />

<android.support.design.widget.FloatingActionButton
android:id="@+id/fab"
android:layout_width="wrap_content"
android:layout_height="wrap_content"
android:layout_margin="@dimen/fab_margin"
android:layout_marginBottom="8dp"
android:layout_marginEnd="8dp"
android:layout_marginStart="8dp"
app:layout_constraintBottom_toBottomOf="parent"
app:layout_constraintEnd_toEndOf="parent"
app:layout_constraintStart_toStartOf="parent"
app:srcCompat="@android:drawable/ic_dialog_email" />

</android.support.constraint.ConstraintLayout>

fab은 메뉴 버튼, fab1과 fab2는 fab을 누를 시 나오는 항목들


2. fab 버튼 이벤트 구현

class MainActivity : AppCompatActivity() {

private var isMenuCollapsed = true

override fun onCreate(savedInstanceState: Bundle?) {
super.onCreate(savedInstanceState)
setContentView(R.layout.activity_main)
setSupportActionBar(toolbar)

fab.setOnClickListener { view ->
val constraintSet = ConstraintSet()
constraintSet.clone(menu_layout)

if(isMenuCollapsed) {
// Set fab1's position to top of fab
constraintSet.connect(fab1.id, ConstraintSet.BOTTOM, fab.id, ConstraintSet.TOP)
// Set fab2's position to top of fab1
constraintSet.connect(fab2.id, ConstraintSet.BOTTOM, fab1.id, ConstraintSet.TOP)
}
else {
// Set fab1's position back to bottom
constraintSet.connect(fab1.id, ConstraintSet.BOTTOM, fab.id, ConstraintSet.BOTTOM)
// Set fab2's position back to bottom
constraintSet.connect(fab2.id, ConstraintSet.BOTTOM, fab.id, ConstraintSet.BOTTOM)
}
val transition = AutoTransition()
transition.duration = 300
transition.interpolator = AccelerateDecelerateInterpolator()

TransitionManager.beginDelayedTransition(menu_layout, transition)
constraintSet.applyTo(menu_layout)

isMenuCollapsed = !isMenuCollapsed
}
}

override fun onCreateOptionsMenu(menu: Menu): Boolean {
// Inflate the menu; this adds items to the action bar if it is present.
menuInflater.inflate(R.menu.menu_main, menu)
return true
}

override fun onOptionsItemSelected(item: MenuItem): Boolean {
// Handle action bar item clicks here. The action bar will
// automatically handle clicks on the Home/Up button, so long
// as you specify a parent activity in AndroidManifest.xml.
return when (item.itemId) {
R.id.action_settings -> true
else -> super.onOptionsItemSelected(item)
}
}
}


이 방법은 menu_layout의 클론(constraintSet)을 만들고 fab1과 fab2의 새로운 위치를 지정 해주고 Transition을 한다. 결과적으로는 두 개의 menu_layout을 통해 애니메이션을 구현한 것이다.


Constraint를 잘 활용하면 예제처럼 아래서 위로 가는 것뿐만 아니라 오른쪽에서 왼쪽 또는 대각선 까지 다양한 방향 전환이 가능하다.


GitHub : https://github.com/Hot6ix/FloatingActionButton

참조 : https://robinhood.engineering/beautiful-animations-using-android-constraintlayout-eee5b72ecae3

'Android > Kotlin' 카테고리의 다른 글

커스텀 리스트뷰 ( Custom ListView)  (0) 2017.12.21
Volley를 이용한 간단한 네트워크 통신  (0) 2017.12.21
by JamesY 2018. 1. 9. 23:45

1. 기본 환경 세팅


- 두 액티비티 모두 Google Map 적용

- 사용자지정 액태비티 전환을 위한 코드 삽입

https://developer.android.com/training/material/animations.html?hl=ko#Transitions


2. Google Map에 적용

두 액티비티의 소스 코드 중 초기 Google Map Fragment를 가져오는 부분에 추가

val mapFragment = supportFragmentManager
.findFragmentById(R.id.map) as SupportMapFragment
mapFragment.view!!.transitionName = resources.getString(R.string.shared_element_map)

Fragment의 View를 가져와 TransitionName을 넣는다. 

넣은 후 액티비티 전환을 위한 Intent의 Options을 정의할 때 다음과 같이 추가한다.

var options = ActivityOptionsCompat.makeSceneTransitionAnimation(this,
Pair<View, String>(map.view, ViewCompat.getTransitionName(map.view)))


by JamesY 2018. 1. 8. 17:54

Kotlin으로 작성된 커스텀 리스트뷰 예제


MainActivity.kt

import android.content.Context
import android.os.Bundle
import android.support.v7.app.AppCompatActivity
import android.view.LayoutInflater
import android.view.View
import android.view.ViewGroup
import android.widget.BaseAdapter
import android.widget.TextView
import kotlinx.android.synthetic.main.activity_main.*

class MainActivity : AppCompatActivity() {

override fun onCreate(savedInstanceState: Bundle?) {
super.onCreate(savedInstanceState)
setContentView(R.layout.activity_main)

val list: ArrayList<CustomItem> = ArrayList()
list.add(CustomItem("James", 23, "Male"))
list.add(CustomItem("Jamie", 20, "Female"))
list.add(CustomItem("John", 30, "Male"))

listview1.adapter = CustomAdapter(this, list)
}

private class CustomAdapter(context: Context, array: ArrayList<CustomItem>): BaseAdapter() {

private var list: ArrayList<CustomItem> = array
private var inflater: LayoutInflater = LayoutInflater.from(context)

override fun getView(p0: Int, p1: View?, p2: ViewGroup?): View {

val view: View?
val viewHolder: ViewHolder

if(p1 == null) {
view = this.inflater.inflate(R.layout.listview_item, p2,false)
viewHolder = ViewHolder(view)
view.tag = viewHolder
}
else {
view = p1
viewHolder = view.tag as ViewHolder
}

viewHolder.name.text = list[p0].name
viewHolder.age.text = list[p0].age.toString()
viewHolder.gender.text = list[p0].gender

return view!!
}

override fun getItem(p0: Int): Any {
return list[p0]
}

override fun getItemId(p0: Int): Long {
return p0.toLong()
}

override fun getCount(): Int {
return list.size
}

}

private class ViewHolder(view: View?) {

val name: TextView = view?.findViewById(R.id.nameTextView) as TextView
val age: TextView = view?.findViewById(R.id.ageTextView) as TextView
val gender: TextView = view?.findViewById(R.id.genderTextView) as TextView
}

data class CustomItem(var name: String, var age: Int, var gender: String)
}


listview_item.xml

<?xml version="1.0" encoding="utf-8"?>
<LinearLayout xmlns:android="http://schemas.android.com/apk/res/android"
android:layout_width="match_parent"
android:layout_height="match_parent">

<TextView
android:id="@+id/nameTextView"
android:layout_width="wrap_content"
android:layout_height="wrap_content"
android:layout_weight="1"
android:text="TextView" />

<TextView
android:id="@+id/ageTextView"
android:layout_width="wrap_content"
android:layout_height="wrap_content"
android:layout_weight="1"
android:text="TextView" />

<TextView
android:id="@+id/genderTextView"
android:layout_width="wrap_content"
android:layout_height="wrap_content"
android:layout_weight="1"
android:text="TextView" />
</LinearLayout>


GitHub : https://github.com/Hot6ix/SimpleCustomListView

by JamesY 2017. 12. 21. 17:52

Volley를 이용하여 간단한 HTTP 통신을 하는 예제이다.


1. AndroidManifest.xml 에서 권한 명시 

<uses-permission android:name="android.permission.INTERNET" />


2. build.gradle 내  dependencies 에 Volley 사용을 위한 명시

compile 'com.android.volley:volley:1.1.0'


3. Build - Make Project 를 하여 프로젝트에서 Volley 사용 가능


4. HTTP 통신 예제

import android.os.Bundle
import android.support.v7.app.AppCompatActivity
import android.util.Log.i
import com.android.volley.Request
import com.android.volley.RequestQueue
import com.android.volley.Response
import com.android.volley.toolbox.StringRequest
import com.android.volley.toolbox.Volley
import kotlinx.android.synthetic.main.activity_main.*

class MainActivity : AppCompatActivity() {

lateinit var request: RequestQueue
lateinit var stringRequest: StringRequest

override fun onCreate(savedInstanceState: Bundle?) {
super.onCreate(savedInstanceState)
setContentView(R.layout.activity_main)

// Setup RequestQueue
request = Volley.newRequestQueue(this)
val url = "http://www.google.com"

// Setup StringRequest
stringRequest = StringRequest(Request.Method.GET, url, Response.Listener<String> {
response -> textView1.text = response // Print http source using textview
}, Response.ErrorListener {
error -> i(applicationContext.packageName, error.toString()) // Print log if error occurred
})

// Set tag for cancel
stringRequest.tag = applicationContext.packageName
// Request
request.add(stringRequest)
}

override fun onStop() {
super.onStop()

// Cancel all request that have packageName tag
if(request != null) {
request.cancelAll(applicationContext.packageName)
}
}
}


GitHub : https://github.com/Hot6ix/SimpleHttpRequest


출처 : https://developer.android.com/training/volley/simple.html

by JamesY 2017. 12. 21. 16:30

안드로이드 6.0 이후부터는 일부 권한의 경우 단순히 AndroidManifest.xml 에 명시하더라도 작동이 되지 않는다.


설치될 때 권한을 부여하는 것이 아니라 실행되는 도중 런타임에 권한을 요청하기 때문이다.


하지만 여전히 AndroidManifest.xml 에 권한을 명시해야 한다.


예제의 경우 주소록 읽기 권한을 요청한다.


권한 요청


if (ContextCompat.checkSelfPermission(thisActivity,
               
Manifest.permission.READ_CONTACTS)
       
!= PackageManager.PERMISSION_GRANTED) {

       
// 권한이 없으므로 요청
       
ActivityCompat.requestPermissions(thisActivity,
               
new String[]{Manifest.permission.READ_CONTACTS},
                MY_PERMISSIONS_REQUEST_READ_CONTACTS
);

       
// MY_PERMISSIONS_REQUEST_READ_CONTACTS 의 경우 사용자 정의 값으로
       
// 응답 처리에 필요
}


응답 처리


@Override
public void onRequestPermissionsResult(int requestCode,
       
String permissions[], int[] grantResults) {
   
switch (requestCode) {
       
case MY_PERMISSIONS_REQUEST_READ_CONTACTS: {
           
// If request is cancelled, the result arrays are empty.
           
if (grantResults.length > 0
               
&& grantResults[0] == PackageManager.PERMISSION_GRANTED) {

               
// 권한 획득

           
} else {

               
// 권한 획득 실패
           
}
           
return;
       
}

       
// other 'case' lines to check for other
       
// permissions this app might request
   
}
}


별도의 요청이 필요한 권한 목록


CALENDAR
CAMERA
CONTACTS
LOCATION
MICROPHONE
PHONE
SENSORS
SMS
STORAGE


출처 : https://developer.android.com/training/permissions/requesting.html?hl=ko

by JamesY 2017. 12. 21. 14:06


사진 1


Navigation Drawer(네비게이션 드로워)

안드로이드가 발전하고 있는 만큼 화면의 효율적인 활용이 중요시 되고 있다.  ActionBar, Fragment 등을 이용하여 화면을 분할하고 각각에 역할을 줄 수 있게 되었다. Navigation Drawer도 화면을 효율적으로 사용할 수 있게 해주는 방법 중 하나이다. 대부분의 구글 앱에는 Navigation Drawer가 적용되어 있고, 인기 앱에도 자주 사용되고 있다.

소스 다운로드 및 소개 페이지

http://developer.android.com/intl/ko/training/implementing-navigation/nav-drawer.html  에서

오른쪽 중간 부분에 'Download the sample app'을 다운하면 된다.

또는

NavigationDrawer.zip


소스를 보면 메인 클래스 하나가 전부이다.

변수 정의

    private DrawerLayout mDrawerLayout; // 주 기능
    private ListView mDrawerList; // 내용
    private ActionBarDrawerToggle mDrawerToggle; // 주 기능

    private CharSequence mDrawerTitle; // ActionBar의 제목을 변경하기 위한 변수
    private CharSequence mTitle; // ActionBar의 제목을 변경하기 위한 변수
    private String[] mPlanetTitles; // 태양계 행성 이름들

onCreate()

@Override protected void onCreate(Bundle savedInstanceState) { super.onCreate(savedInstanceState); setContentView(R.layout.activity_main); // 액션바 제목 mTitle = mDrawerTitle = getTitle(); // strings.xml의 데이터 삽입 mPlanetTitles = getResources().getStringArray(R.array.planets_array); // DrawerLayout 정의 mDrawerLayout = (DrawerLayout) findViewById(R.id.drawer_layout); // DrawerLayout Shadow 정의(사진 2 참조) mDrawerLayout.setDrawerShadow(R.drawable.drawer_shadow, GravityCompat.START); // ListView 정의 mDrawerList = (ListView) findViewById(R.id.left_drawer); // ListView 데이터 정의 mDrawerList.setAdapter(new ArrayAdapter<String>(this, R.layout.drawer_list_item, mPlanetTitles)); // ListView 아이템 클릭 리스너 mDrawerList.setOnItemClickListener(new DrawerItemClickListener()); // ActionBar의 홈버튼을 Navigation Drawer 토글기능으로 사용 getActionBar().setDisplayHomeAsUpEnabled(true); getActionBar().setHomeButtonEnabled(true); // 토글 정의 mDrawerToggle = new ActionBarDrawerToggle( this, mDrawerLayout, R.drawable.ic_drawer, R.string.drawer_open, R.string.drawer_close ) { public void onDrawerClosed(View view) { getActionBar().setTitle(mTitle); invalidateOptionsMenu(); } public void onDrawerOpened(View drawerView) { getActionBar().setTitle(mDrawerTitle); invalidateOptionsMenu(); } }; // Drawer Layout의 리스너를 mDrawerToggle로 정의 mDrawerLayout.setDrawerListener(mDrawerToggle); // 인스턴스 상태가 존재 안하면 가장 첫번째 아이템으로 시작 if (savedInstanceState == null) { selectItem(0); } }


사진 2

DrawerItemClickListener() & selectItem()

private class DrawerItemClickListener implements ListView.OnItemClickListener {
        @Override
        public void onItemClick(AdapterView<?> parent, View view, int position, long id) {
            selectItem(position);
        }
    }

    private void selectItem(int position) {
        ⁄// 리스트 아이템 클릭 시 변경됨
        Fragment fragment = new PlanetFragment();

        // Fragment에 추가적인 정보 저장
        Bundle args = new Bundle();
        args.putInt(PlanetFragment.ARG_PLANET_NUMBER, position);
        fragment.setArguments(args);

        // FragmentManger가 Fragment가 바뀔때마다 교체해줌
        FragmentManager fragmentManager = getFragmentManager();
        fragmentManager.beginTransaction().replace(R.id.content_frame, fragment).commit();

        // 아이템이 계속 클릭된 상태로 유지
        mDrawerList.setItemChecked(position, true);

        // ActionBar 제목 변경(해당 글에는 넣지 않음.)
        setTitle(mPlanetTitles[position]);

        // Drawer Layout 닫기
        mDrawerLayout.closeDrawer(mDrawerList);
    }

PlanetFragment Class

public static class PlanetFragment extends Fragment { public static final String ARG_PLANET_NUMBER = "planet_number"; public PlanetFragment() { // Fragment 하위 클래스 때문에 필요함 } // 기본 Fragment의 화면 정의 @Override public View onCreateView(LayoutInflater inflater, ViewGroup container, Bundle savedInstanceState) { View rootView = inflater.inflate(R.layout.fragment_planet, container, false); int i = getArguments().getInt(ARG_PLANET_NUMBER); String planet = getResources().getStringArray(R.array.planets_array)[i]; int imageId = getResources().getIdentifier(planet.toLowerCase(Locale.getDefault()), "drawable", getActivity().getPackageName()); ((ImageView) rootView.findViewById(R.id.image)).setImageResource(imageId); getActivity().setTitle(planet); return rootView; } }

이 외에도 여러 메소드들이 존재하지만 이 글에는 최소한의 Drawer Layout 생성 및 작동에 필요한 메소드들과 클래스만 적어두었다. 

activity_main.xml

<android.support.v4.widget.DrawerLayout
    xmlns:android="http:⁄⁄schemas.android.com⁄apk⁄res⁄android"
    android:id="@+id⁄drawer_layout"
    android:layout_width="match_parent"
    android:layout_height="match_parent">
    
    <FrameLayout
        android:id="@+id⁄content_frame"
        android:layout_width="match_parent"
        android:layout_height="match_parent" ⁄>
    
    <ListView
        android:id="@+id⁄left_drawer"
        android:layout_width="240dp"
        android:layout_height="match_parent"
        android:layout_gravity="start"
        android:choiceMode="singleChoice"
        android:divider="@android:color⁄transparent"
        android:dividerHeight="0dp"
        android:background="@android:color⁄white"⁄>
<⁄android.support.v4.widget.DrawerLayout>

DrawerLayout에 FrameLayout과 ListView를 넣어 구현하였다.

FrameLayout말고 다른 Layout이 삽입되어도 된다.

drawer_list_item.xml

<TextView xmlns:android="http:⁄⁄schemas.android.com⁄apk⁄res⁄android"
    android:id="@android:id⁄text1"
    android:layout_width="match_parent"
    android:layout_height="wrap_content"
    android:textAppearance="?android:attr⁄textAppearanceListItemSmall"
    android:gravity="center_vertical"
    android:paddingLeft="16dp"
    android:paddingRight="16dp"
    android:textColor="@android:color⁄black"
    android:background="?android:attr⁄activatedBackgroundIndicator"
    android:minHeight="?android:attr⁄listPreferredItemHeightSmall"⁄>

각각의 리스트 아이템에 적용되는 속성이다.

fragment_planet.xml

<ImageView xmlns:android="http:⁄⁄schemas.android.com⁄apk⁄res⁄android"
    android:id="@+id⁄image"
    android:layout_width="match_parent"
    android:layout_height="match_parent"
    android:background="#000000"
    android:gravity="center"
    android:padding="32dp" ⁄>

각각의 Fragment의 이미지들의 대한 속성이다.


구글이 제공하는 소스에는 ListView를 이용한 Drawer Layout을 구현되어 있다. 하지만 이 ListView를 좀 더 커스텀하여 꾸밀 수도 있고, ListView가 아닌 Layout을 넣음으로써 텍스트뷰, 버튼, Radio 버튼, 체크박스, 레이아웃 종류 등 다양한 시도를 할 수 있다.

크리에이티브 커먼즈 라이선스
이 저작물은 크리에이티브 커먼즈 저작자표시-비영리-변경금지 4.0 국제 라이선스에 따라 이용할 수 있습니다.
by JamesY 2013. 11. 13. 19:46

출처 : http://android-codes-examples.blogspot.kr/2011/03/customized-listview-items-selection.html

나도 다른 곳에서 한참 헤매다 어느 사이트에서 여기를 알려주었다.

중요한 것은

색을 지정한 list_bg.xml

<?xml version="1.0" encoding="utf-8"?>
<selector xmlns:android="http://schemas.android.com/apk/res/android">
<item
android:state_selected="false"
android:state_pressed="false"
android:drawable="@color/grey" />
<item android:state_pressed="true"
android:drawable="@color/blue" />
<item android:state_selected="true"
android:state_pressed="false"
android:drawable="@color/blue" />
</selector>

을 정해주고

이 xml을 커스텀한 리스트 xml에 있는 주요 layout의 background로 지정해준다.

<?xml version="1.0" encoding="utf-8"?>
<RelativeLayout xmlns:android="http://schemas.android.com/apk/res/android"
android:layout_width="fill_parent" android:layout_height="wrap_content"
android:layout_margin="2dp" android:background="@color/list_bg">

<TextView android:id="@+id/post" android:gravity="center_vertical"
android:layout_width="wrap_content" android:layout_height="50dp"
android:textSize="20sp" android:textColor="#D0640D"
android:layout_toRightOf="@+id/bite_image" />

</RelativeLayout>

중요한 부분을 굵게 표시하였다.


'Android > Tips' 카테고리의 다른 글

런타임에 권한 요청  (0) 2017.12.21
Navigation Drawer 분석  (1) 2013.11.13
커스텀 리스트뷰 만들기  (0) 2012.10.14
안드로이드 다중 replace 사용  (0) 2012.10.10
Google Places API 리뷰 가져오기 관해서...  (0) 2012.10.08
by JamesY 2012. 10. 15. 20:20

http://androiddeveloper.tistory.com/73


개인적으로 여기가 가장 커스텀리스트뷰 만들기에 정리도 잘되있고 쉽게 되있습니다.

by JamesY 2012. 10. 14. 12:33

String s = "안녕하세요.";

s = s.replace("안","앚");

s = s.replace("녕","녖");

System.out.println(s);

결과는 "안녖하세요."가 나온다.

해결법은 replace를 저렇게 따로 따로 넣지 말고 한줄에 붙인다.

s = s.replace("안","앚").replace("녕","녖").replace("하", "핮");

결과는 "앚녖핮세요."가 나오게 된다.

by JamesY 2012. 10. 10. 10:43
| 1 2 3 |